You did everything the capture articles asked. You found a deck, you tapped the RF, you sat through a transfer in real time, and now there is a file on the disk — a big one, maybe several gigabytes per tape — with an extension like .lds or .flac that no media player will touch. Double-click it and nothing happens, or you get a wall of noise. It is tempting to think something went wrong. Nothing did. What you have is the raw radio-frequency signal straight off the tape, and it was never meant to be watched directly — it is the input to the half of the job that actually turns a capture into a picture. That half is what this piece is about: how to use vhs-decode to turn a stack of these RF files on disk into a watchable, keepable archive. If you have landed here without the earlier context, the mechanism is laid out in how vhs-decode actually works, and the transfer itself in the capture hardware guide.
Capturing is not decoding
The mental model worth holding onto is that capture and decode are two genuinely separate jobs, and you have only done the first. Capture writes down the raw signal that comes off the spinning heads — the modulated radio frequency, before the deck has turned it into anything you would recognise as a picture. A normal VCR does the decoding in hardware, on the fly, with circuits fixed in the 1980s; the RF approach skips all of that and saves the untouched signal so that software can do the work afterwards, far more carefully and re-doably. The file you are looking at is that untouched signal. Decoding is the software pass that reads it and reconstructs the image, line by line.
The word I would lean on is reconstruct, not restore. The decoder rebuilds the picture from what the tape actually held; it does not add anything that was never recorded, and it is not in the business of making a tired tape look new. That distinction matters enough that I have given it its own piece — why AI upscaling doesn’t fix old tapes — but it is worth carrying through every step below: a faithful reconstruction of a soft, noisy source is still a soft, noisy picture, and that is the point of doing it this way.
Step 1 — how to use vhs-decode
The first command takes the RF file and produces the picture data. The tool accepts a spread of input formats depending on how you captured: .lds (the 40 MSPS packed format a Domesday Duplicator writes by default), .ldf (the same thing FLAC-compressed), a plain .flac from a CX card capture, or raw samples such as .u8. One firm rule: the capture has to be lossless or raw. A capture saved to MP3 or Vorbis is ruined for this purpose — those codecs discard exactly the signal detail the decoder needs.
The command form is straightforward — an input file and an output name, with the output name being a base rather than a filename with an extension:
vhs-decode --pal --tape_format VHS --threads 4 input.lds my-first-decodeA handful of flags carry most of the weight, and they are worth knowing in plain terms. The system flag — --pal or --ntsc — is not optional: the decoder cannot guess whether it is looking at a 625-line PAL signal or a 525-line NTSC one, and getting it wrong gives you a broken picture with the wrong colour and the wrong framerate. --tape_format defaults to VHS, so you only set it for S-VHS, Video8, Betamax and the like only. --tape_speed (or --ts) tells it SP, LP or EP; the long and extended-play modes use different de-emphasis, so leaving it off on an EP recording gives you the wrong result. And --threads behaves in a way that surprises people: for the video decode, three or four is the sweet spot, and piling on more cores actually makes it slower. The work simply does not parallelise past that point.
Beyond those, there is a small set of options I would turn on as a matter of course — in fact they are the defaults I ship in DdD Capture Toolkit, because they earn their place on the great majority of tapes without you having to think about them. --no_resample skips a resampling step that is not needed when the capture is already at the rate the decoder works in, which saves a little time. --recheck_phase re-checks the colour phase on every frame rather than trusting the first lock, so colour holds together across scene changes and tape joins where it would otherwise slip. And --ire0_adjust pulls the black level to sit at IRE 0 where it belongs, so blacks come out properly black rather than lifted and grey. Folding those in, a dependable starting command looks more like this:
vhs-decode --pal --tape_format VHS --threads 4 --no_resample --recheck_phase --ire0_adjust input.lds my-first-decodeThat is deliberately not the whole story. vhs-decode carries a long list of further options — for black-and-white sources, for stubborn signals, for chasing down a particular artefact — and the right ones depend entirely on what is on the tape and how it was captured. The three above are a sound default for an ordinary PAL colour VHS recording; the rest are worth reaching for case by case, and I will give them a piece of their own rather than bury them here.
When it finishes you will have three files sharing your output name. The .tbc is the luma — the brightness picture, time-base-corrected, stored as raw greyscale. The _chroma.tbc is the colour, demodulated separately (more on why in a moment). And the .tbc.json is a metadata sidecar — it records the system, the position of every field in the original signal, and the dropout coordinates, and the downstream tools genuinely need it. I treat that JSON as part of the master: even if you later delete the big intermediate files, keep the JSON and the log, because they hold the field timing the audio-sync step depends on.
Now set your expectations on time, because this is the part that catches people out. Decoding runs well below real time. On a typical desktop you can expect somewhere around three to five frames per second, which means a two-hour tape can take anywhere from twelve to thirty-plus hours, depending on the machine and how noisy the capture is. Apple Silicon does noticeably better; an older quad-core does noticeably worse. The bottleneck is memory bandwidth rather than raw clock speed, so a faster CPU helps less than you would hope. The one piece of advice I would treat as non-negotiable is to decode to and from an SSD — spinning disk drags the whole thing down. And if hand-running each of the stages below is not your idea of an evening, there is a alternative path at the end of this article that wraps the lot.
Step 2 — check it before you commit the hours
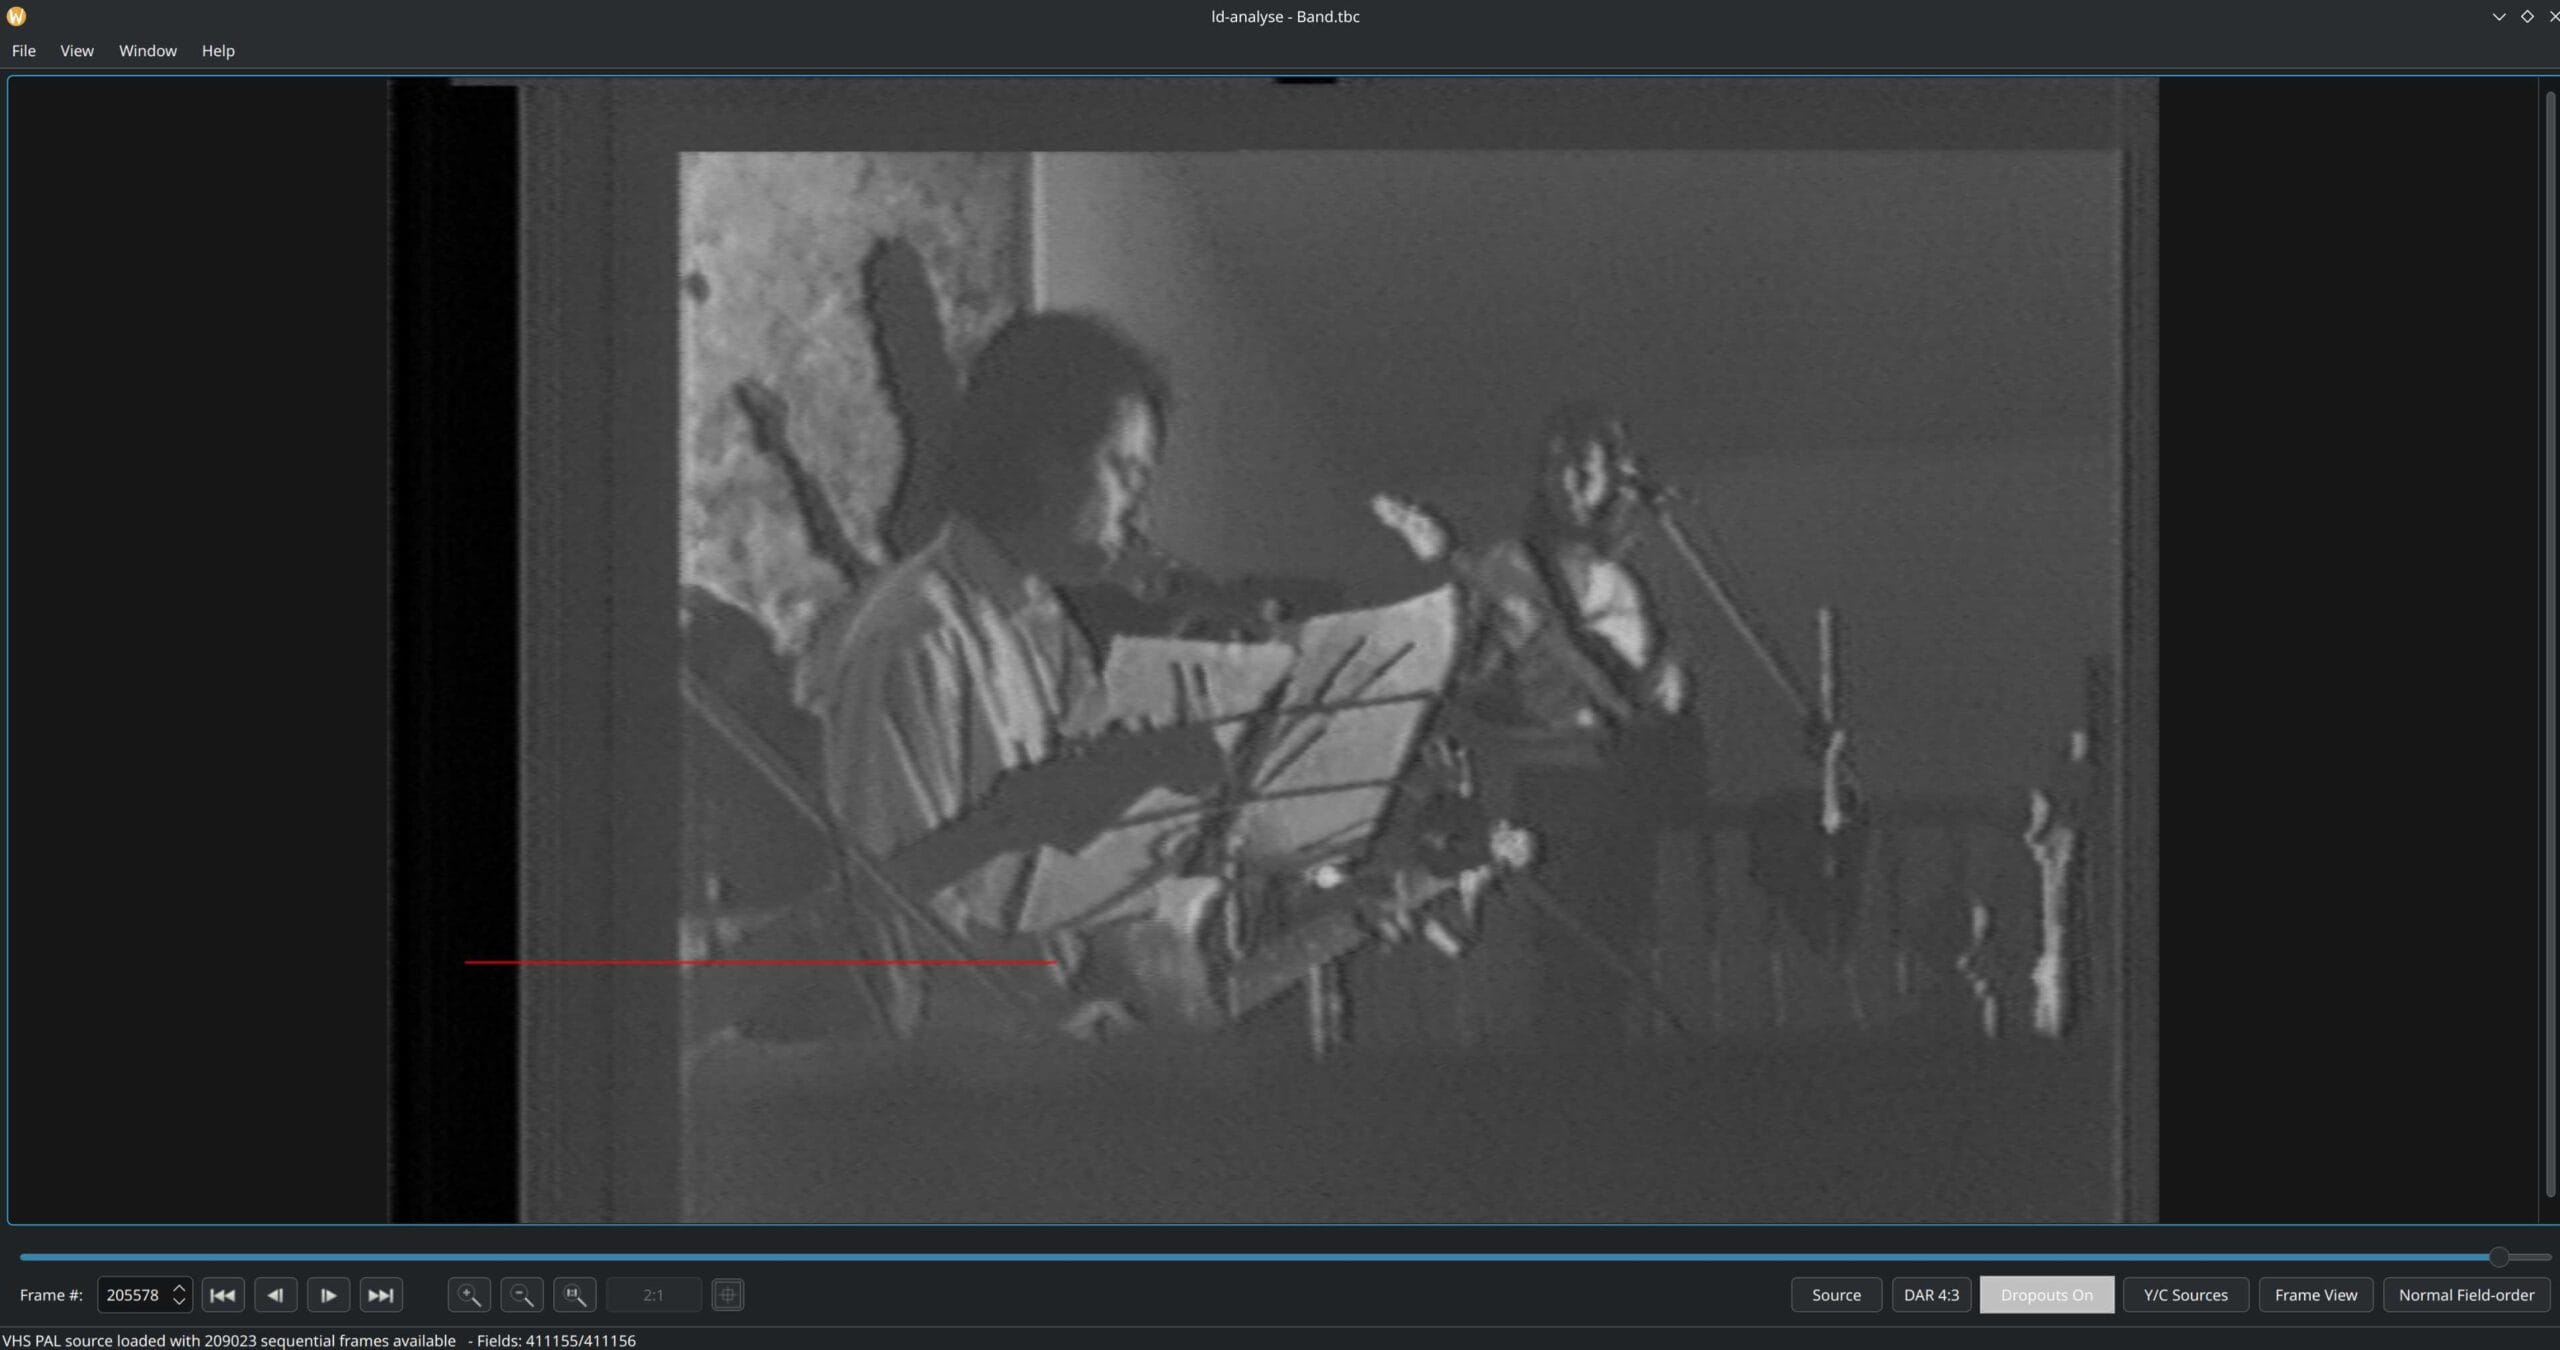
Given how long a full decode takes, the most valuable habit I can pass on is to look at the result before you commit to the whole tape. The tool for that is ld-analyse, which opens the .tbc and its chroma companion and lets you inspect them. A few things are worth your attention. The picture itself, obviously — but turn on the dropout overlay, which marks missing signal in red and blue, and you get an immediate read on how clean the transfer is. The graph I check first is Black SNR: you want a roughly flat line, and as a rough guide anything around 30 dB and up is usable, while 44 to 50 dB is excellent. Dips and spikes in that line point to dropouts, interference or a weak signal. The third view I lean on is the field split, which shows the two fields of a frame side by side — one bad field next to one clean field is the tell-tale signature of a dirty head or a head clog.
The faults have fairly legible signatures once you have seen them. A picture that is skewed or will not lock, usually with a grainy texture, most often means a sample-rate or system mismatch, or RF that was down-sampled too far on capture. No colour, or weak washed-out colour, shows up as a vectorscope that collapses toward the centre — the colour reference has been lost. Hard white lines and a heavy “snowing” look point to tracking loss and weak RF. None of these need a full two-day decode to diagnose. A ten-second test export tells you almost everything before you start the long run, and it costs you a few minutes rather than an evening.
Step 3 — colour is a separate pass
This is where the two .tbc files earn their explanation. VHS does not record colour the way broadcast composite does; it shifts the colour down to a lower frequency and lays it underneath the brightness — the so-called colour-under system. The decoder demodulates the two separately and keeps them in separate files for a good reason: when colour and brightness share one signal, the leftover colour subcarrier shows up in the picture as dot crawl, that crawling checkerboard along sharp colour edges. Keeping luma and chroma apart means neither contaminates the other, and the dot crawl never gets baked in.
The colour reconstruction is done by ld-chroma-decoder, and the choice of decoder matters more than the documentation lets on. For VHS colour-under, the 2D comb decoders are the ones that work — pal2d for PAL, ntsc2d for NTSC. The clever-sounding options — the Transform decoders and the 3D comb — are built for clean LaserDisc and composite sources, and they actively misbehave on VHS, because the per-line phase rotation in the colour-under signal breaks the assumptions those filters rely on. So the rule of thumb is plain: 2D for VHS, and leave the 3D and Transform modes for cleaner sources.
In practice, though, most people never call ld-chroma-decoder by hand. The export tool you will meet in Step 5, tbc-video-export, runs it for you — it is essentially dropout correction, the chroma decode and ffmpeg bundled into one command — three or four programs in a trenchcoat, more or less. It is useful to understand what is happening under that one command, but you do not normally drive the colour pass yourself.
Step 4 — the audio path
Audio is its own small project, and where it comes from shapes how you handle it. VHS holds sound in two main ways. There is the linear edge track — a thin audio-cassette-style stripe along the edge of the tape, usually mono — which is captured as ordinary baseband audio off the deck’s RCA outputs. And there is Hi-Fi FM, the near-CD-quality stereo carried under the video, which you can either take as baseband off the RCA jacks or, for the cleanest result, capture as raw RF from a Hi-Fi tap and decode with hifi-decode into a 24-bit, 48 kHz FLAC.
The catch is sync. The decoded video comes out at a perfect, normalised framerate — exactly 25 or 29.97 frames per second. The tape, though, never played at a perfectly steady speed, and if the audio was captured on a separate device its clock drifts independently to the video. Put those together and the sound creeps out of step over a long recording, even if it started aligned. There are three layers of fix, and they stack: capturing audio and video off a shared clock (the ClockGen or MISRC approach) removes the drift between devices; an initial offset read from the .tbc.json lines up the start; and a drift-compensation tool — VhsDecodeAutoAudioAlign, also called vhs-decode-aaa — uses the per-field timing in that JSON to stretch the audio to match the video’s real field-by-field timing across the whole tape. Anything longer than a short clip really wants that last step. I have gone into the capture-side of this in more depth in the capture hardware and audio-sync guide, which is the place to look if sync is your sticking point.
Step 5 — export the archival master
The .tbc files still are not something you can hand to a relative; they are raw greyscale data. The last step turns everything into a finished file, and it is a single command:
tbc-video-export --ffmpeg-profile ffv1 my-first-decode.tbc my-first-decode.mkvThat gives you FFV1 video — a lossless codec, the rough equivalent of FLAC for pictures — inside a Matroska .mkv container, exported as 10-bit 4:2:2 with the audio muxed in. The choice of format is not arbitrary, and this is one area where the reasoning rests on something firmer than community habit. FFV1 is a published standard, set out in IETF RFC 9043, and Matroska likewise in RFC 9559, both produced by the IETF’s CELLAR working group. The United States Library of Congress lists FFV1-in-Matroska as a “Preferred” format for video preservation in its Recommended Formats Statement — a status it reached in 2023 with input from the Federal Agencies Digital Guidelines Initiative (FADGI), which funded the work needed to close the remaining gaps. The EU’s PREFORMA project, in the same vein, funded the open-source MediaConch tool that checks files for conformance to those standards. In other words, the format you are exporting to is the one that national memory institutions have settled on for keeping moving images — which is a reassuring place for a family archive to land.
One distinction is worth making explicit: the FFV1/MKV file is your master, not your viewing copy. It is large and lossless, and its job is to be the authoritative version you keep and never touch again. From it you derive a small access copy — an H.264 or H.265 MP4 — which is the one you actually watch, share and put on a phone. Keep the master, distribute the derivative.
And the storage reality, named plainly because it is easy to underestimate: an FFV1 master runs roughly 40 to 50 GB per hour of VHS. A six-hour tape, then, is somewhere around 250 to 300 GB on its own. Noisier tapes compress less and sit at the top of that range. A serious project (i.e. multiiple captures) of a hundred-plus hours is squarely into multi-terabyte territory, and that is worth planning for before you start rather than discovering halfway through.
An alternative path through the same chain
Everything above is a chain of commands you can absolutely run by hand, and I would argue it is worth understanding them at least once — when something goes wrong, knowing what each stage does is the difference between a quick fix and a baffled evening. But once you are working through a stack of tapes, remembering the exact flags for every stage, every time, gets old fast, and that is where mistakes creep in. So I will mention DdD Capture Toolkit here, because it exists for exactly this. DdD-capture-toolkit, an open-source Python project that runs the whole pipeline for you — capture, decode, compress, export, validate and archive — with hardware-aware scheduling so several decodes can run at once, a realy nice capability when you have a large multi-tape archiving project. And the fiddly audio sync is handled for you.
The part I care most about for an archive is at the end of the chain: it does per-project SHA-256 hashing for archival and a three-tier compression-integrity check, so you can confidently delete the huge intermediate TBC files and the non compressed RF file once the master and compression is complete. It is aimed at bulk, serious archiving — the kind of work where large projects need repeatable transfers. Linux is the first-class platform; macOS and Windows have the groundwork laid but still want testers, so if you are on either, reports are genuinely welcome. None of this replaces the manual path — that path stays perfectly valid, and it is the right way to learn — it just spares you re-typing the flags on tape number forty.
What this workflow can’t fix
As I’ve said before, naming the limits is, I think, the most useful part of a guide like this, because it stops you chasing detail that was never on the tape. The first and hardest is the old rule: garbage in, garbage out. The decode reconstructs the RF you captured, and it cannot invent picture that a bad capture, a worn tape or an EP-speed recording never preserved in the first place. A weak signal stays weak; a recording made at extended play, with its narrower tracks, has a lower ceiling that no software pass raises. This is the same trap AI upscaling falls into — synthesising plausible detail is not the same as recovering real detail — and I have set out exactly why in why AI upscaling doesn’t fix old tapes.
Dropout correction deserves a comment, because it is easy to over-trust. It is concealment, not reconstruction: it copies picture from the matching field alongside to paper over a gap. That works invisibly on still or slow material, but it smears on fast motion, because the borrowed content no longer matches. And where the signal was never captured at all — a clogged head, a tape that is shedding, a physical break — there is nothing adjacent to borrow from, so the loss simply stands. Hi-Fi audio is blunter still: it currently has no dropout correction at all, so a gap in the captured audio is an audible gap.
Then there is the practical cost, which is real. The decode is slow and CPU-bound — there is no GPU acceleration to fall back on — and the files are large at every stage. And it is genuinely command-line and multi-step, with format-specific flags at each turn, which means there is a real learning curve and plenty of room to get a setting wrong. I would rather say that plainly than pretend it is plug-and-play. It is a powerful workflow that produces a better master than any other route I know of, and it asks for patience and a bit of study in return.
What’s next
Once you have a master you trust, the work shifts from making the file to keeping it — checksums, copies, a storage plan that outlives the drive it is on, and a structure someone else could pick up after you. I have written that side up in designing a family archive that survives you — the preservation part, which is the natural next read from here. And there is a further piece to come on the restoration and post-production end — deinterlacing, cleanup, the derivatives you actually share — for when the master is safely put away and you want to make a watchable copy that does the footage justice.


