
Connect cassette deck to computer, step by step
In Part III we covered how to clean your equipment and tapes for the best possible sound quality. In Part IV we cover how to connect cassette deck to computer, so you can record your cassette tape to a digital format.
The Impatient Option
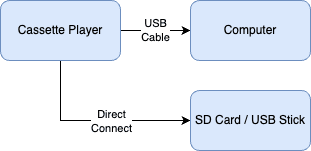
In Part II we covered connecting a cheap walkman-style device — purchased online from AliExpress or eBay — that has a built-in USB port to connect to your computer, or that saves directly to an SD card. The diagram below shows how to connect it.
The Libran Option
This option focuses on lifting quality by adding a better rack-mount cassette deck and a dedicated analog capture device such as the Focusrite 4i4. As you can see from the diagram, you lose the ability to save directly to an SD card or USB stick, and gain an extra device in the chain.

The Perfectionist Option
In the Perfectionist option, all that really changes is the cassette player and analog capture device — both are replaced with higher-quality units. The way they’re connected is generally the same.

Reel-to-reel or other analog audio source
If you have a different source, such as a reel-to-reel player, simply replace the cassette player with the reel-to-reel (or other device) — the process is otherwise the same. The one difference is that your player may have the older DIN-style connector instead of RCA. You can still buy these — such as this one on AliExpress.

What’s next
Part V — the actual recording step — is in preparation and will follow.
")


")
")
